We
will learn How to programming with Android Framework. Before you start
writing your first example using Android SDK, you have to make sure that
you have setup your Android development environment properly as
explained in Android - Environment Setup tutorial.you must have a little
bit working knowledge with Eclipse IDE OR android Studio.
For android development you need :
- Install Android SDK
- Install ADT Eclipse plugin
- Create an Android Virtual Device (AVD)
- Create Android Project with Eclipse (Wizard)
- Start it in Android Virtual Device (AVD)
- JDK 1.7 (JAVA DEVELOPMENT KIT )
- Eclipse IDE 3.7 , Indigo , juno or latest
- Android SDK (SOFTWARE DEVELOPMENT KIT)
- Get ready with new android development tool "Android Studio". Download Here.
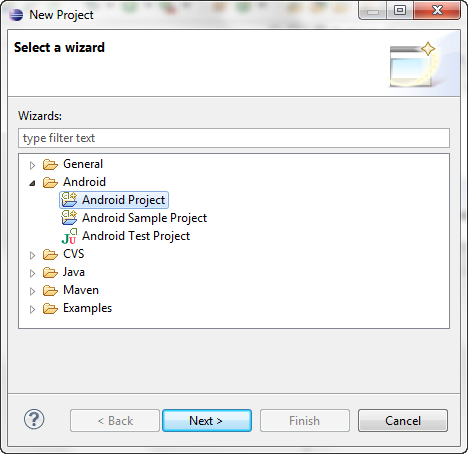
Creating a New Project Select File -> New -> Project... -> Android -> Android Application Project.

->Next

In this screen for creating a new android project. Let's understand every field shown above.
Application Name: application
name is nothing but the name of your app. This name is visible on the
screen when the app is installed. The application name is also shown in
Google Play Store when you upload your application.
- Project Name: Project name is the name of your project that gets created in eclipse. You can give any name to your project.This name is invisible in Google Play Store so no wary about it.
- Package Name: This is very important. Package name is used to uniquely identify your application on Play Store. You should follow the java package convention for the package name . The package name is not shown to the user but should not change ever.
- Min Required SDK: Android started with version 1.5 and UP. Version code define Android OS name, like 2.3 is termed Gingerbread, 4.1 as Ice Cream Sandwich etc. Min Required SDK field gives your app supported from to higher level version. , if you create an application for android 2.3 it will work on android 4.4. In general, it is advisable to create minimum supported version of API.
- Target SDK: This setting tells android that even though your app will be able to run on its previous android version, but it is explicitly tested with version specified here in this field.
- Compile With: This option gives lets you choose the version of SDK you want to compile with.This will compile your app with the latest code and API.
- Theme: These themes are nothing but some predefined color schemes, which you can use to improve your application's User Interface.
Goto next >

- Create Custom Launcher Icon: This icon is nothing but the launcher icon. If this option is checked ADT will provide you to create a launcher icon. Keep this option selected.
- Create Activity: With this option selected, ADT will create 1st activity for you, this will be your main activity and will have a reference in Androidmanifest.xml.
- Mark This project as Library: Any android project can be of 2 types, library project or a non library project.Library project cannot be installed. we give just reference in other non library project.
- Create Project in Workspace: When we open Eclipse/ADT for the first time, it asks you to choose a work space. Workspace is nothing but a location on your hard disk where all your projects will be saved.
- Add Project to working sets: Working Set can be used to Group Similar projects.you can group them into working sets to avoid seeing all projects while working.
Go to Next:

If you have checked the create custom launcher check box, it providing the creation of launcher icon.
On this screen, you can configure different options to create a launcher icon. You can choose your own image, Text or clip-arts.
Go to Next:

These templates have predefined structures and they automatically generate required code for you.
- Blank Activity: this will create a blank activity
- Full Screen Activity: This activity hides the status bar title bar and lunching with full screen.
- Master Detail Flow: Creates advanced navigation Like slider, with fragments, which will work on tablets and Mobiles.
Now select Blank activity

- Activity Name: this will be the name of your activity its created by you.
- Layout Name: you will also create a layout for bind it with the activity.
- Navigation Type: your app provide like tabs,dropdown,slider etc.
Click Finish:
The below is show structure and Packages of project.

Now Step 1: to Write code into activity_main.xml
<RelativeLayout xmlns:android="http://schemas.android.com/apk/res/android"
xmlns:tools="http://schemas.android.com/tools"
android:layout_width="match_parent"
android:layout_height="match_parent" >
<TextView
android:layout_width="wrap_content"
android:layout_height="wrap_content"
android:layout_centerHorizontal="true"
android:layout_centerVertical="true"
android:padding="@dimen/padding_medium"
android:text="@string/hello_world"
tools:context=".MainActivity" />
</RelativeLayout>
Step 2: Write code into strings.xml
<resources>
<string name="app_name">HelloWorld</string>
<string name="hello_world">Hello world!</string>
<string name="menu_settings">Settings</string>
<string name="title_activity_main">MainActivity</string>
</resources>
Step 3: Write code into MainActivity.java
Package com.emprovantiontechsol.hello
import android.os.Bundle;
import android.app.Activity;
import android.view.Menu;
import android.view.MenuItem;
import android.support.v4.app.NavUtils;
public class MainActivity extends Activity {
@Override
public void onCreate(Bundle savedInstanceState) {
super.onCreate(savedInstanceState);
setContentView(R.layout.activity_main);
}
@Override
public boolean onCreateOptionsMenu(Menu menu) {
getMenuInflater().inflate(R.menu.activity_main, menu);
return true;
}
}
Now Process to Run You Project:
Right click on project and go to-> Run As->1 Android Application
After this, ADT (Android Development Tool) will Lunch automatic Best Android Virtual Device (AVD) for your app.

NOTE: No need to change in AndroidManifest.xml
Happy Programming.... all the Best:


No comments :
Post a Comment